2. Supervised Learning#
Taught by: Dat Doan, Alex Ganose
Getting started#
Welcome to the second practical session! As always, the notebook is designed to be run online directly in your browser by clicking the rocket icon on the top right and selecting Live Code.
Outline#
This workshop will cover the following content:
Decision trees for classification
Decision trees for regression
Ensemble learning – bagging and random forests
Model evaluation and training protocols
Hyperparameter optimisation
Task: Classifying metallicity
Decision trees – classification#
Decision trees are a simple yet versatile algorithm that can be used for both classification and regression. They are a fundamental component of ensemble methods such as random forests and gradient boosted trees.
Pros
Don’t require much data preparation.
Make few assumptions about the training data.
Easy to interpret and visualise.
Predictions are fast.
Cons
Default training algorithmm (CART) is greedy. It preduces a solution that is reasonably good but is not guaranteed to be the optimal solution (finding this is intractable even for small datasets).
Very sensitive to dataset variations – small details lead to large changes in the model.
They struggle to describe linear functions well.
You can find more details about the decision trees on the excellent scikit-learn documentation.
We’ll start with the iris dataset from scikit-learn that we used in Workshop 1. As a reminder, this dataset contains 150 samples of iris flowers, each with four features. The target variable is the species of iris, which can be one of three possible values: setosa, versicolor, or virginica (given as integers 0, 1, and 2, respectively).


First, we load the dataset and create a pandas DataFrame object.
import pandas as pd
import numpy as np
from sklearn.datasets import load_iris

np.random.seed(42)  # use a consistent seed for reproducibility

iris = load_iris()
df = pd.DataFrame(
    data=np.c_[iris['data'], iris['target']],
    columns=iris['feature_names'] + ['target'],
)
df.target = df.target.astype(int)
df
We’ll now perform multivariate classification using a decision tree. We’ll use the scikit-learn library to train the model and evaluate its performance.
Let’s train the model with two features, the petal length and petal width. We’ll use a tree with a max depth of 3.
from sklearn.tree import DecisionTreeClassifier

features = ["petal length (cm)", "petal width (cm)"]

X = df[features].values
y = df.target.values

model = DecisionTreeClassifier(max_depth=3, random_state=42)
model.fit(  )
Code hint
As with all scikit-learn models, you'll need to pass the feature matrixX and target class y to the fit function.
We can plot the decision tree using a nice utility function from scikit-learn.
from sklearn.tree import plot_tree
import matplotlib.pyplot as plt

plt.figure(figsize=(10, 8))
plot_tree(
    model,
    feature_names=features,
    class_names=iris.target_names,
    filled=True,
)
plt.show()
Each white box represents a binary question (i.e. it can either be true or false). Each coloured box represents a leaf node which gives the final classification.
The “gini” values describe the to Gini impurity, defined as
where \(p_{i,k}\) is the ratio of class \(k\) instances among the training instances in the \(i\)-th node, and \(K\) is the total number of classes (in this case 3). A “pure” node (gini=0) indicates all training instances it applies to belong to the same class.
For example, the depth-2 green node (versicolor) has a gini score equal to
You can see that these numbers correspond to the value list which give the number of samples of each class considered by the node.
We can use the DecisionBoundaryDisplay class to plot the descision boundaries.
from sklearn.inspection import DecisionBoundaryDisplay

fig, ax = plt.subplots()
display = DecisionBoundaryDisplay.from_estimator(
    model,
    X,
    alpha=0.3,
    plot_method="pcolormesh",
    ax=ax,
    xlabel=features[0],
    ylabel=features[1],
)
scatter = ax.scatter(*X.T, c=iris.target, edgecolor="k")
ax.legend(scatter.legend_elements()[0], iris.target_names, loc="upper left")
ax.set(xlim=(0, 7.5), ylim=(0, 3))

# plot the decision boundary labels
ax.plot([2.45, 2.45], [0, 3], "k")
ax.plot([2.45, 7.5], [1.75, 1.75], 'k--')
ax.plot([4.95, 4.95], [0, 1.75], 'k:')
ax.plot([4.85, 4.85], [1.75, 3], 'k:')
ax.text(1.20, 1.0, 'Depth = 0')
ax.text(3.2, 1.80, 'Depth = 1')
ax.text(3.8, 0.5, 'Depth = 2')

plt.show()
When making a prediction, you start at the top of the tree (the root node) and progress down the tree by answering the questions in each descision node. For example, the root node asks the question “is the petal length smaller than 2.45 cm?”
The probability of each class is estimated by returning the ratio of training instances of class \(k\) in this node.
Consider an example flower with a petal length of 5 cm and a petal width of 1.5 cm. Following the tree or decision boundary plots shown above:
The petal length is greater than 2.45 cm, therefore we take the right route at depth 0.
The petal with is less than 1.75 cm, therefore we take the left route at depth 1.
Finally, the the petal length is greater than 4.95 cm and we take the right route at depth 2.
This gives a final class prediction of virginica.
The corresponding leaf node is the depth-3 second-from-the-left node (with samples=6), so the Decision Tree should output the following probabilities: 0% for Iris setosa (0/6), 33.33% for Iris versicolor (2/6), and 66.66% for Iris virginica (4/6).
We can check this directly using the model. First lets predict the most likely class of our flower.
X_new = [[   ]]  # a new data point with petal length 5 and petal width 1.5
model.predict(X_new)
Code hint
You need to add the features toX_new. For example, X_new = [[5, 1.5]]
We can understand the probability of each class by using the predict_proba method. This method returns the probability of each class for a given input data point. The sum of the probabilities of all classes is equal to 1.
model.predict_proba(X_new)
Classification metrics
We can assess the classification performance using a number of metrics such as log loss, accuracy, precision, etc. We can also use the confusion matrix to see the number of true positives, true negatives, false positives, and false negatives.
To start with, we can plot the confusion matrix using the ConfusionMatrixDisplay class from scikit-learn.
from sklearn.metrics import ConfusionMatrixDisplay

ConfusionMatrixDisplay.from_estimator(
    ,
    X,
    y,
    display_labels=iris.target_names,
    cmap="Blues"
)
plt.show()
It looks like we made a mistake with the ConfusionMatrixDisplay.from_estimator function.
If you add a ? after the function name you can generate the docstring for the function. Can you spot the mistake?
Code hint
We need to add ourmodel instance as the first argument to the function.
We can see that the decision tree does a good job of classifying the iris dataset. There are only a few misclassifications. 3 flowers are misclassified as virginica when they are in fact veriscolor. While 1 flower is classified as versicolor when it is in fact virginica.
While the confusion matrix is a human interpretable way to understand the performance of a classifier, it is not a good way to compare the performance of different classifiers. For this, we can use metrics that condense the performance into a single number.
We already explored the log loss metric in the last workshop. But as a reminder, it is a metric that penalizes classifiers that are confident about the wrong class. Log loss is defined as:
Where \(N\) is the total number of samples, \(K\) is the total number of classes, \(y_{i,k} = 1\) if sample \(i\) has label \(k\) or 0 otherwise. The model predictions \(p_{i,k}\) are the predicted probabilities of the sample \(i\) being in class \(k\).
Let’s calculate the log_loss for our model now.
from sklearn.metrics import log_loss

y_pred = model.predict_proba(X)
log_loss(y, y_pred)
Code hint
We need to add the argumentsy and y_pred to the log_loss function.
We can see that the log loss is very small. This is because the model is able to predict the classes with reliability.
While log loss is a very useful metric for training and evaluating models, especially neural networks, it is not easy to understand for humans. Here we can use the accuracy, precision, recall, and F1 score to evaluate the model’s performance. These are defined as follows (remember that TP, TN, FP, and FN stand for true positive, true negative, false positive, and false negative, respectively):
Accuracy: the fraction of correct predictions among all predictions \( = (\text{TP} + \text{TN}) / (\text{TP} + \text{TN} + \text{FP} + \text{FN})\)
Precision: the fraction of true positive predictions among all positive predictions \( = \text{TP} / (\text{TP} + \text{FP})\)
Recall: the fraction of true positive predictions among all actual positive instances \( = \text{TP} / (\text{TP} + \text{FN})\)
F1 score: the harmonic mean of precision and recall - \(= 2 * (\text{Precision} * \text{Recall}) / (\text{Precision} + \text{Recall})\)
We can calculate these easily using scikit-learn.
from sklearn.metrics import accuracy_score, precision_score, recall_score, f1_score

y_pred = model.predict(X)

# we can use the `average` parameter to compute the weighted average
# since we have a multi-class classification problem
accuracy = accuracy_score(y, y_pred)
precision = precision_score(y, y_pred, average="weighted")
recall = recall_score(y, y_pred, average="weighted")
f1 = f1_score(y, y_pred, average="weighted")

print(f"Accuracy: {accuracy:.3f}")
print(f"Precision: {precision:.3f}")
print(f"Recall: {recall:.3f}")
print(f"F1: {f1:.3f}")
Decision trees – regression#
While decision trees are often used for classification, they can also be used for regression. In this case, the decision tree is used to predict a continuous target variable. The decision tree works in the same way as for classification, but the splitting criterion is different. Instead of using the Gini impurity, the decision tree uses the mean squared error (MSE) to determine the best split.
Let’s try this out on some noisy polynomial data.
num_points =

x = 6 * np.random.rand(num_points) - 3
y = 3 * x ** 2 + np.random.randn(num_points)

fig, ax = plt.subplots()
ax.scatter(x, y)
ax.set(xlabel='$x$', ylabel="$y$")
plt.show()
Code hint
You need to choose the number of points. 50 should be fine, but you have the power to decide.We can now train a DecisionTreeRegressor on our data.
from sklearn.tree import DecisionTreeRegressor

X = x.reshape(-1, 1)  # reshape to a 2D array for scikit-learn

model = DecisionTreeRegressor(max_depth=2)
model.fit(X, y)
Similarly to the classification problem we saw before, we can plot the tree to see what it learned.
plt.figure(figsize=(12, 6))
plot_tree(
    model,
    feature_names=['x'],
    filled=True,
)
plt.show()
We can see a visual representation of this by plotting the decision tree across the range of the data.
X_new = np.linspace(-3, 3, 1000).reshape(-1, 1)
y_new = model.predict(X_new)

fig, ax = plt.subplots()
ax.plot(X_new, y_new, label="decision tree", color="red")
ax.scatter(x, y)
ax.set(xlabel='$x$', ylabel="$y$")
ax.legend()
plt.show()
You can see a classic limitation of decision trees. They are only able to predict continuous functions in horizontal segments. This is a consequence of the depth of the tree and the other hyperparameters.
Mini Task: Impact of max depth
In the cell below, you play around with the max depth parameter. Try training a series of DecisionTreeRegressors and plotting their performance across the function domain. What happens when you set the max depth to 3, 5, or 10.
# Use this cell to experiment with different depths
# What happens when you set the max depth to 1, 3 or 10
Code hint
The code below will create, train, and plot the performance of the decision tree.
model1 = DecisionTreeRegressor(max_depth=1)
model3 = DecisionTreeRegressor(max_depth=3)
model10 = DecisionTreeRegressor(max_depth=10)

model1.fit(X, y)
model3.fit(X, y)
model10.fit(X, y)

y_new1 = model1.predict(X_new)
y_new3 = model3.predict(X_new)
y_new10 = model10.predict(X_new)

fig, ax = plt.subplots()
ax.plot(X_new, y_new1, label="max_depth=1", color="red")
ax.plot(X_new, y_new3, label="max_depth=3", color="green")
ax.plot(X_new, y_new10, label="max_depth=10", color="orange")
ax.scatter(x, y)
ax.set(xlabel='$x$', ylabel="$y$")
ax.legend()
plt.show()
Ensemble methods#
Ensemble learning uses the principle that aggregating multiple predictions of a group of models often gives better predictions than just the best individual model (wisdom of the crowd).
One approach to ensemble methods is bagging which stands for bootstrap aggregating.
Bootstrap: Randomly sampling the training data with replacement (i.e, we can select the same data point multiple times).
Aggregating: Combining the predictions of multiple models, either by averaging (regression) or by taking the majority vote (classification).
One issue with naive bagging is that the models are highly correlated with each other. To address this, we can introduce additional randomness by limiting the number of features that can be used to train each individual model. For each tree, we can randomly select a subset of features. This variation of bagging is called Random Forests.
Let’s try training a random forest on the polynomial data we just generated. We’ll use the RandomForestRegressor class available in scikit-learn.
from sklearn.ensemble import RandomForestRegressor

model = RandomForestRegressor()
model.fit(X, y)
Let’s see how it performs.
X_new = np.linspace(-3, 3, 1000).reshape(-1, 1)
y_new = model.predict(X_new)

fig, ax = plt.subplots()
ax.plot(X_new, y_new, label="random forest", color="red")
ax.scatter(x, y)
ax.set(xlabel='$x$', ylabel="$y$")
ax.legend()
plt.show()
Clearly, it does a much better job than a single decision tree.
Hyperparameters
Random forests have a number of hyperparameters that can be tuned to improve performance. Some common hyperparameters include:
n_estimators: the number of trees in the forestmax_depth: the maximum depth of the treesmax_samples: the number of samples to draw from the dataset to train each tree
In the next section, we’ll learn how to use hyperparameter tuning to find the best values for these hyperparameters.
Feature importances
A nice feature of random forests is that they can assign an importance score to each feature based on how useful they are at predicting the target variable. The importance score is a numerical value that indicates how much the model performance decreases if we remove a particular feature. The importance score is computed by averaging the improvement in the model’s performance brought by a feature across all trees in the forest.
To understand this feature, we’ll use the diabetes dataset from scikit-learn. The dataset consists of ten baseline variables. The target variable is a quantitative measure of disease progression one year after baseline.
from sklearn.datasets import load_diabetes

diabetes = load_diabetes()

X = diabetes.data
y = diabetes.target

print(diabetes.DESCR)
We can access the feature importances using the feature_importances_ attribute. Let’s train a model and see what these look like.
model = RandomForestRegressor()
model.fit(X, y)

importances = model.feature_importances_
importances
This is a list of each importance for every feature in the training dataset. This is quite hard to understand in this format but we can plot it for easier interpretation.
fig, ax = plt.subplots()
std = np.std([tree.feature_importances_ for tree in model.estimators_], axis=0)
ax.bar(diabetes.feature_names, importances, yerr=std)
ax.set(ylabel="Importance")
plt.show()
Finally, let’s check how well our model is performing by calculating the mean absolute error of predictions. The mean absolute error is defined as:
where:
\(n\) is the number of samples
\(y_i\) is the true target value
\(\hat{y}_i\) is the predicted target value
from sklearn.metrics import mean_absolute_error

y_pred = model.predict(X)
mse = mean_absolute_error(  )
print(f"Mean absolute error: {mse:.2f}")
Code hint
You need to add the true target valuesy and the predicted values y_pred as arguments to the mean_absolute_error function.
Model training procedure#
So far, we have used the entire dataset for training the model. This is generally not a good practice, as it can lead to overfitting. Overfitting occurs when a model learns the training data too well, capturing noise along with the underlying patterns. This can cause the model to generalise poorly on new, unseen data.
To avoid overfitting, we should split the dataset into two parts:
The training set: used to train the model.
The test set: used to evaluate the model’s performance on unseen data.
The scikit-learn library provides a function called train_test_split to do this.
It randomly splits the dataset into training and test sets.
The test_size parameter determines the proportion of the dataset to include in the test set.
We’ll use a value of 0.2, indicating that 20% of the data is reserved for testing.
Let’s split the diabetes dataset into training and test sets and train a random forest regressor on the training set.
from sklearn.model_selection import train_test_split

X_train, X_test, y_train, y_test = train_test_split(X, y, test_size=0.2, random_state=42)

model = RandomForestRegressor()
model.fit(X_train, y_train)

y_pred = model.predict(X_test)
mse = mean_absolute_error(y_test, y_pred)
print(f"Mean absolute error: {mse:.2f}")
How does this compare to the MAE of the model trained on the full dataset? Why do you think this is?
Cross-validation
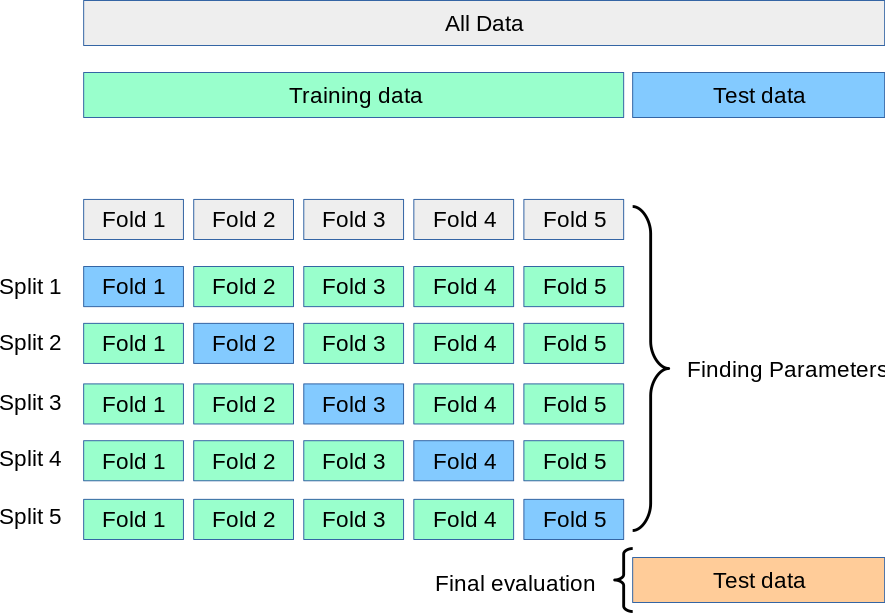
While splitting the dataset into training and test sets is a good practice, it can lead to variability in the model’s performance. This is because the performance metrics can vary depending on how the dataset is split. Cross-validation is a technique used to address this issue. It involves splitting the dataset into multiple parts (folds) and training the model on different combinations of these parts. The performance metrics are then averaged over all the folds to get a more robust estimate of the model’s performance.
Typically, the dataset is first split into training and test sets. The training set is then used with cross validation to tune the model by adjusting the parameters (hyperparameter tuning). Finally, the test set is used to evaluate the model’s performance.
The scikit-learn library provides a function called cross_val_score to perform cross-validation.
It takes the model, the dataset, the number of folds, and the scoring metric as input.
The function returns an array of scores, one for each fold.
Let’s use cross-validation to evaluate the performance of a random forest regressor on the diabetes dataset. The cv parameter controls how many folds to use. Here we’re using 5.
from sklearn.model_selection import cross_val_score

model = RandomForestRegressor()
scores = cross_val_score(model, X_train, y_train, cv=5, scoring="neg_mean_absolute_error")
mae_scores = -scores
mae_scores

print(f"Mean absolute error: {mae_scores.mean():.2f} (+/- {mae_scores.std() * 2:.2f})")
Hyperparameter tuning
Hyperparameters are parameters that are set before the model is trained and control the learning process and affect the model’s performance. Hyperparameter tuning involves finding the best set of hyperparameters for a given model and dataset. This is typically done using techniques like grid search (where all combinations of parameters are exhaustively tested) or random search (where parameter combinations are selected randomly).
The scikit-learn library provides a class called GridSearchCV to perform grid search.
It takes the model, the hyperparameters to search over, and the scoring metric as input.
The function searches over all possible combinations of hyperparameters and evaluates the model using cross-validation.
Let’s use grid search to find the best set of hyperparameters for a random forest regressor on the diabetes dataset. Here we’ll test the following parameters:
n_estimatorsof 100, 200, 300max_depthof 1, 5, 10
This means we’ll have to train a total of 3 * 3 = 9 models and can take some time. As you can see, exhaustive grid search is only possible when training small models or few hyperparameter combinations.
from sklearn.model_selection import GridSearchCV

param_grid = {
    "n_estimators": [   # Fill in the values   ],
    "max_depth": [   # Fill in the values   ],
}

model = RandomForestRegressor()
grid_search = GridSearchCV(model, param_grid, cv=5, scoring="neg_mean_absolute_error")
grid_search.fit(X_train, y_train)

print(f"Best hyperparameters: {grid_search.best_params_}")
print(f"Best mean absolute error: {-grid_search.best_score_:.2f}")
Code hint
You need to fill out the estimators and max_depth values. For example:
param_grid = {
    "n_estimators": [100, 200, 300],
    "max_depth": [1, 5, 10],
}
We can plot the model performance over the grid of hyperparameters to visualise the results.
results = grid_search.cv_results_
scores = -np.array(results["mean_test_score"]).reshape(len(param_grid["n_estimators"]), len(param_grid["max_depth"]))
scores

fig, ax = plt.subplots()
cax = ax.matshow(scores, cmap="viridis")
ax.set(
    xticks=np.arange(len(param_grid["max_depth"])),
    yticks=np.arange(len(param_grid["n_estimators"])),
    xticklabels=param_grid["max_depth"],
    yticklabels=param_grid["n_estimators"],
    xlabel="max_depth",
    ylabel="n_estimators",
)
plt.colorbar(cax, label="Mean absolute error")
plt.show()
Task: Classifying metallicity#
For this exercise, we’re going to use the matbench_expt_is_metal dataset.
This dataset contains ~4,000 samples of inorganic materials taken from experiments and whether they are metallic or not.
The original dataset just includes the composition from experiments. I have added 23 chemical features to the dataset using the matminer package which are based on elemental properties of the materials.
In particular, these are the Magpie elemental property descriptors which include the melting point, molecular weight, Mendeleev number etc. Because many of the materials contain more than one element, I have taken a weighted sum of the features where the weight is the fraction of the element in the composition.
You can read more about the magpie features here.
Firstly, have a look at the
matbench_expt_is_metaldataset page.Familiarise yourself with the magpie features and think about which ones may have more predicting power over others.
You will need to encode the class variable as an integer (currently it is a boolean - you saw how to do this in Workshop 1).
Fit a decision tree but make sure to split your data into testing and training sets. What’s the prediction success rate? Find out the spread of the success rate (mean, variance).
Fit a random forest classifier. Does this improve things?
Can you tune the parameters to get an even better prediction rate? Use 5-fold cross-validation to obtain a range of predictions, report your average precision for your best model.
Which parameters are more important than others? What happens when you train on a subset of parameters? Play around with this to see what happens.
Bonus: Download and install the XGBoost package. How does this perform.
df = pd.read_csv("https://raw.githubusercontent.com/utf/DataAnalyticsChemistry/refs/heads/main/datasets/is-metal-magpie.csv")
features = df.columns[:-1]
X = df[features].values
y = df["is_metal"].values

df
# Your code here
Additional reading#
This notebook can be complimented with Chapter 6 of Introduction to Statistical Learning for more background to the field.